1917 Thornycroft J Type restoration
Posted by Chris Graham on 15th July 2020
Vehicle restoration projects can take a long while to complete, but the 30-year renovation of Stephen Gosling’s 1917 Thornycroft J Type represents a Herculean effort, as Tim Gosling explains.
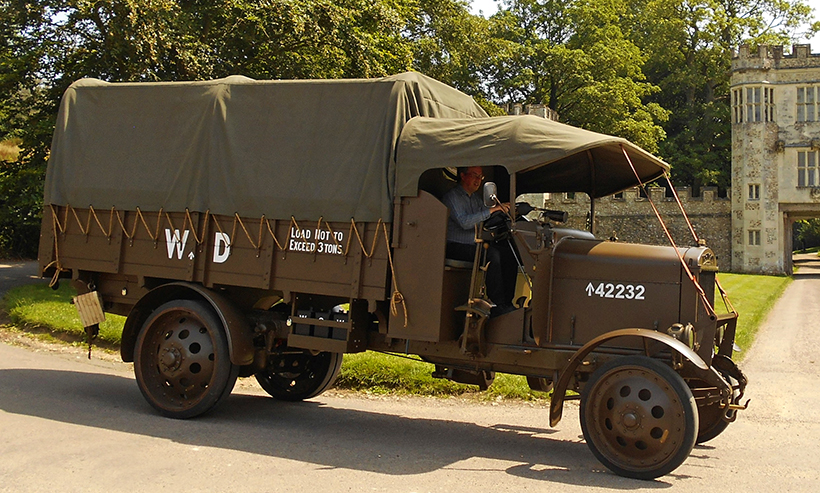
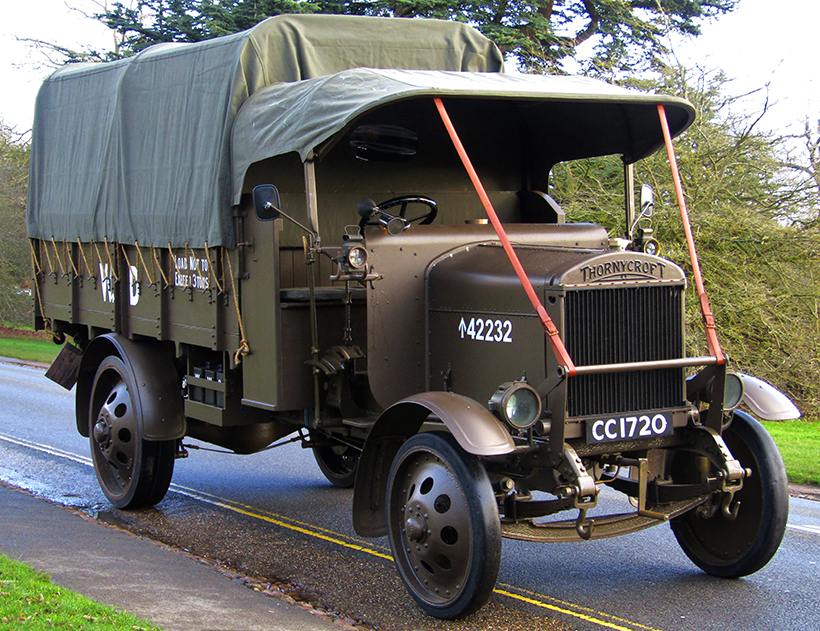
1917 Thornycroft J Type restoration: The cab roof and tarpaulin finish off the lorry perfectly as Steve gets ready to take the Thornycroft to its first event at Haslebury Mill.
The story of how Steve Gosling ended up buying his 1917 Thornycroft J Type goes right back to the mid-1980s, when he started his engineering degree at Imperial College, London. Far from home, he spent his spare time on the care and operation of the college mascot – a 1902 James and Browne car, and also the rebuilding of a 1926 Morris lorry which, some years previously, another student had rolled over while attempting a handbrake turn.
Steve was obviously bitten by the restoration bug as, after he finished university, he started looking for a suitable restoration project of his own. A veteran car was beyond his budget, but a commercial vehicle perhaps not so. After a few false starts, he came across an advert for a Great War vintage Thornycroft ‘J’ Type lorry, that was being offered for sale by Mike Jones of Ruthin. A visit to see the lorry was arranged, and Mike explained how he’d acquired it.
Thornycroft rumour
Interested in all things mechanical, Mike heard rumours of a surviving Thornycroft lorry in a shed at Penmaenmawr granite quarry, in North Wales. Apparently, the lorry had been driven up the mountain in the 1920s and parked in a shed so that the engine could be used to power a water pump. Then, when that part of the quarry ceased operation, the Thornycroft was simply left where it was. So, Mike went to visit the shed, and his first view was the front of the chassis poking out through a wall.
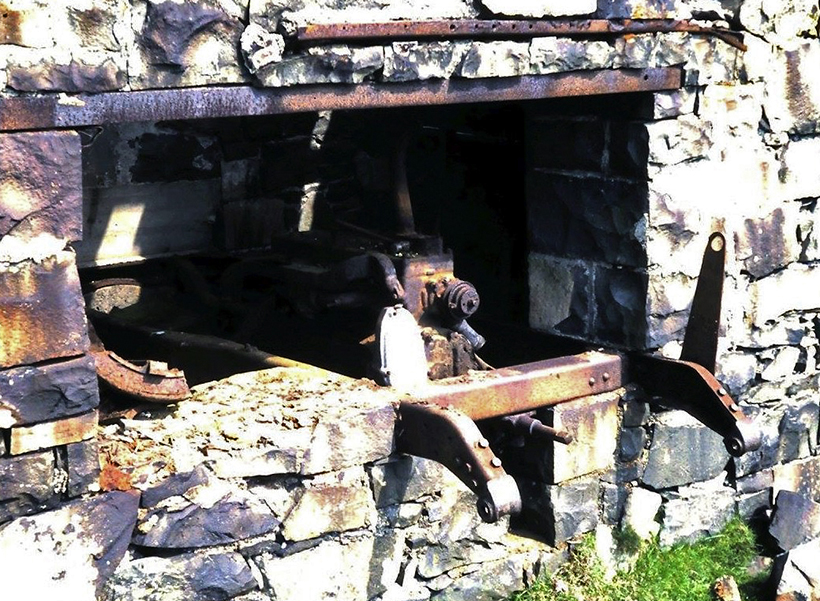
When found by Mike Jones, the Thornycroft had been built into the wall of a pumping house, with the front of the chassis rails poking out through the side of the building. The engine can be just seen in the shadows.
Venturing inside, he found that the back-half of the chassis, together with the wheels and axles, had been removed long ago. The engine had been replaced with a later power plant, but the gearbox was in quite good condition, as was the scuttle and a few other bits and pieces. Mike purchased the lorry but, getting the chassis off the mountain would be a challenging exercise as there was no road or even a track anywhere near the shed.
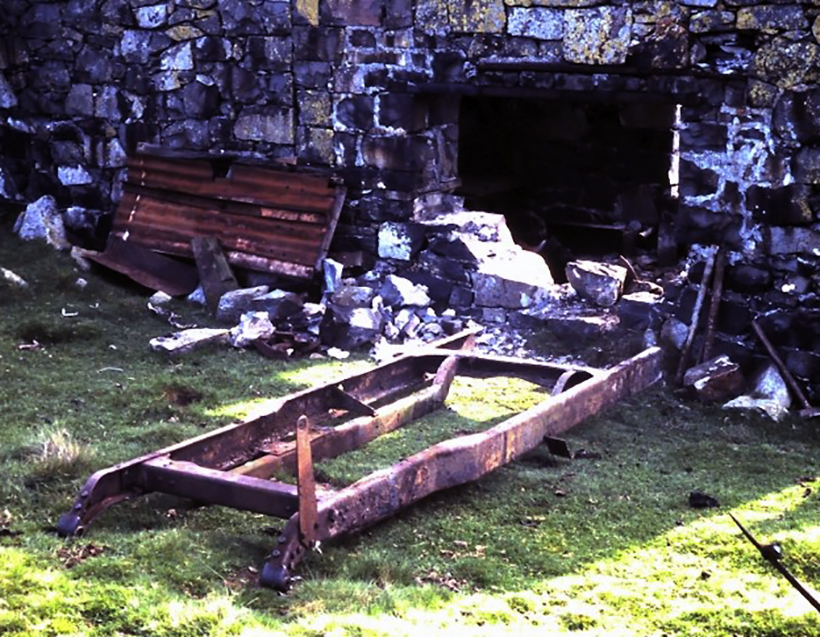
Mike had to extend the size of the hole to get the chassis out. The engine, gearbox and other parts would follow through the enlarged hole, later.
The wall of the shed was knocked down so that the Thornycroft could be removed. Everything that could be salvaged was loaded into the bucket of a bulldozer which carried it away, back down the mountain. Mike had estimated that the restoration of the lorry would take about five years but, after seven years had passed – during which time he’d located just an original front axle and wheels – the collection of parts was put up for sale. Steve, having an engineering background but little concept of the magnitude of the task he was taking on, agreed on a price and the remains of the Thornycroft were shipped down to his parent’s home, in Devon.
When Mike put the Thornycroft up for sale, he laid out all the parts that he’d located. Steve was very brave to take on this restoration.
Value for money?
For his money, Steve had come away with the front half of a chassis, front axle and wheels, a good gearbox (but with a smashed lid), gear change and a scuttle. He compiled a very long shopping list, which included an engine, radiator, steering box, fuel tank, back axle, wheels, differential and the back end of the chassis. How hard could finding these parts be?
Information on the Thornycroft ‘J’ Type was quite difficult to find. A driver’s handbook turned up, but the information it contained was rather rudimentary, and certainly not something on which a full rebuild could be based. Mike Jones had given Steve a wartime postcard containing a picture of a Thornycroft, and explained that pictures of early trucks often featured in postcards from the Great War.
This was a great piece of information, and postcard fairs often became weekend destinations as further images were sought. Steve was now living and working in Southsea, Hants., which was about 100 miles away from the lorry, but would come home every weekend to undertake further restoration work. Coincidentally, just a short distance away from his Southsea address, there was a bus depot containing a preserved 1919 Thornycroft J Type double-decker bus. Using his spare evenings, Steve became a frequent visitor to the depot from where he produced a comprehensive collection of sketches and measurements, which would prove to be his primary reference points.
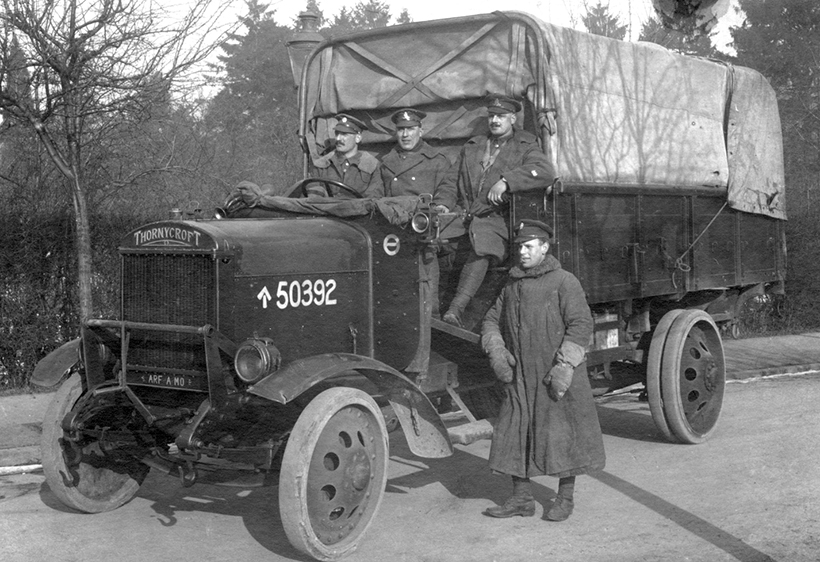
The Thornycroft ‘J’ type was designed in 1913, as a subsidy lorry. New owners would receive a government subsidy on the understanding that, in the time of war, it would be taken into military service. Approximately 5,000 were used by the War Dept during the First World War.
Gearbox tackled first
As the gearbox had been identified as requiring the least amount of attention, this was where the restoration started. The lid had been smashed, so Steve made a wooden pattern which he took to a foundry for casting. The box was dismantled, the bearings replaced as necessary and, once reassembled, it was painted in primer and tucked away in the garage. That was the easy part, now the search for the missing components would take precedence.
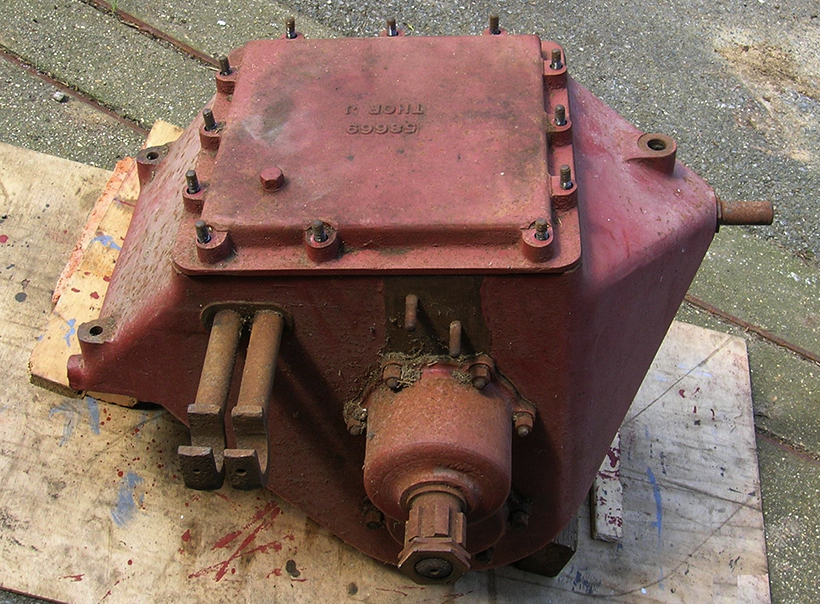
The Welsh chassis did provide a very good gearbox. It did, however, still require new bearings and the fabrication of a replacement lid.
An auction was advertised in nearby Taunton, at which there was an unrestored Thornycroft J being sold, and a Thornycroft M4 engine; the one Steve needed. The Thornycroft was a post-war version and, although very interesting, Steve set his sights on the engine. Other lots weren’t making much money, so he thought the engine was in the bag. Unfortunately, so did someone else. The price went up and up until Steve had to drop out. It was a bitter blow, but the engine is now in the Southern Counties Agricultural Trading Society Thornycroft, that’s displayed at the Milestones Museum, in Basingstoke.
However, Steve’s constant search for parts was beginning to pay off. He found a set of front and rear wheels (in poor condition), a front axle (cut into two), a rear axle (but without the differential) and an engine crankcase complete with pistons and crankshaft but, unfortunately, no cylinders. A real stroke of luck came when another Thornycroft owner put Steve on to a surviving chassis at Chalke Valley, near Salisbury. This chassis, a wartime model, had been converted into a shepherd’s hut in the 1930s. Apart from the steering, every mechanical part had been removed, and a hut had been built on top to provide accommodation for a shepherd while tending his flock.
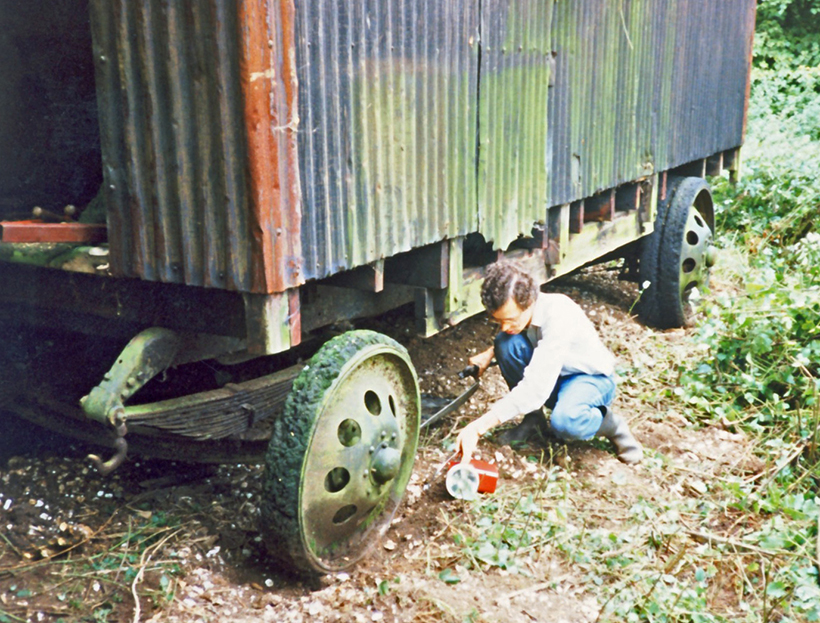
A second chassis was located at Chalke Valley, outside Salisbury, in Wiltshire. Converted into a shepherd’s hut, it gave Steve a better chassis to start from.
Chassis bought
A deal was agreed with the owner, the hut was dismantled and the chassis transported to Devon. The chassis appeared to be in reasonable condition, but the springs were beyond redemption and, perhaps unsurprisingly, the bronze differential had been scrapped a long time ago. Finding a replacement differential was a major concern.
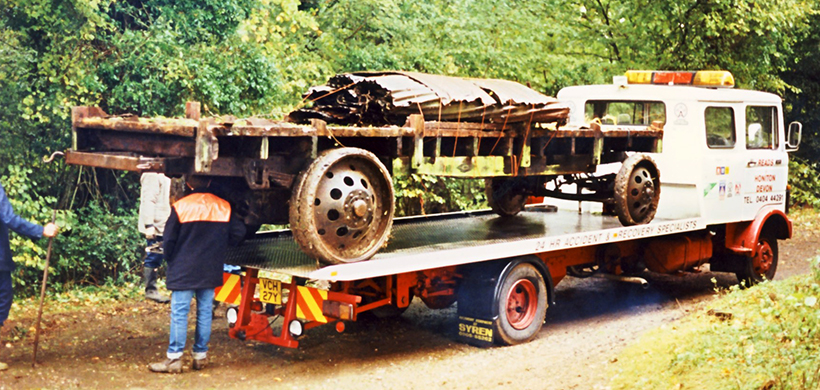
Part of the condition of the purchase was that Steve had to take away the remains of the hut, so it was strapped down on to the chassis to begin its journey down to Devon.
In any restoration, having both good luck and good friends are very important. In 2005, Steve received a phone call from a friend telling him that he’d found a complete engine for him in Auckland. ‘Bishops Auckland?…’ Steve asked. ‘No, Auckland, New Zealand,’ came the response! The engine had been used to power a rock-crusher and looked to be complete, albeit in poor condition.
Hoping that, combined with the parts in the half engine that he already had, a good engine could be made, a deal was done and Steve bought the engine. When it arrived, it appeared to be in worse condition than he’d hoped but, with time in his favour, the engine was regularly soaked in PlusGas in preparation for dismantling.
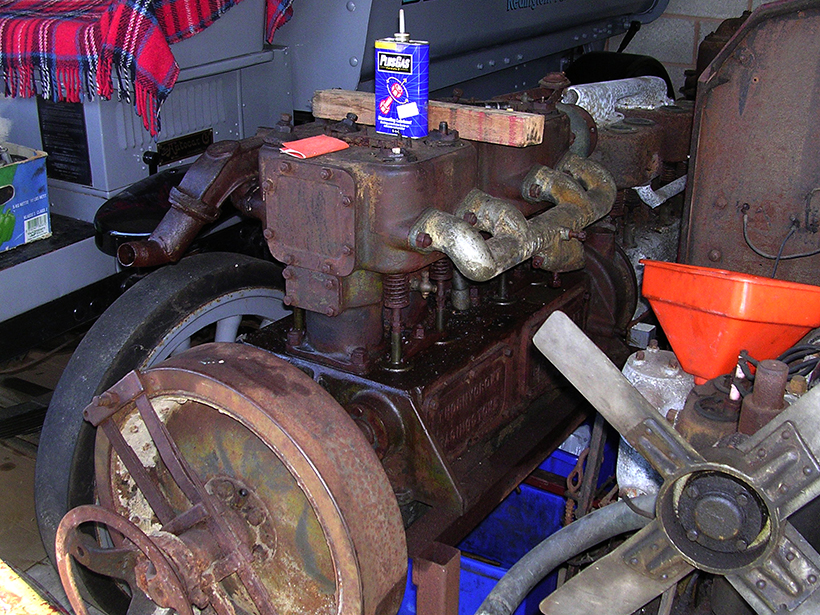
The engine from New Zealand had worked in a quarry, and was covered in a concrete-like dust. Over several years it was regularly soaked in penetrating oil to loosen the bolts.
While the search for the differential continued, Steve hadn’t been idle. Front tyres and an original fan had been found. New springs, mudguards, half-shafts and a radiator shell were made, and the restoration of several other vehicles within the family collection took place – two Autocars, an FWD Model B and a Dennis subsidy lorry, contemporary to the Thornycroft.
The Hampshire Museums Trust required a new radiator for its ‘J’ Type restoration. Steve contributed a share of the pattern costs, and had a radiator cast for himself.
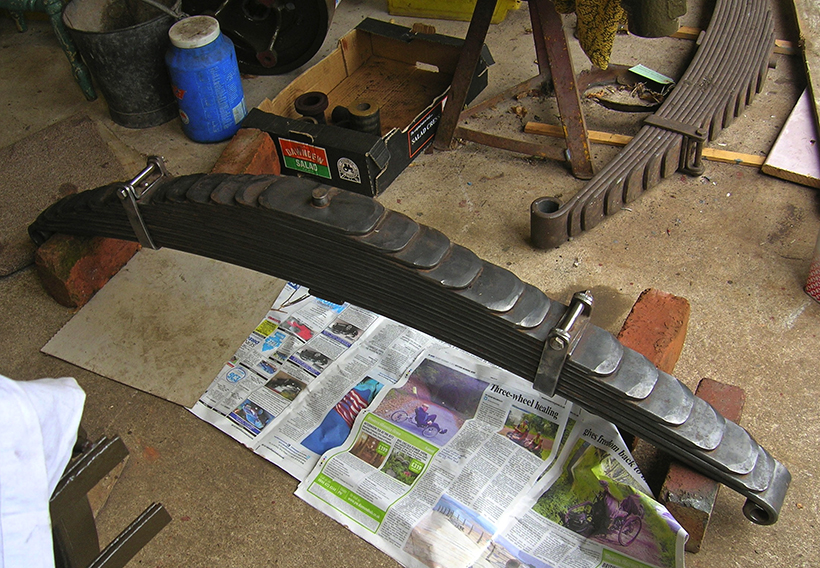
One of the first things Steve made was a new set of springs. Kittle did he know that they would sit on a shelf for over 20 years, before actually being required.
The most difficult part of the restoration would be bringing back the engine, so he switched his full attention to this. The first task was to remove the water pump which, due to corrosion, was very difficult. After several days of struggle it was finally removed, and Steve’s dad, Tony, set to work dismantling it. The shroud was broken and the impeller was badly damaged. But, thanks to another great stroke of luck, Steve’s friend Stephen Pettifer, who’d restored a Thornycroft some years previously, still had a spare impeller which he was hap[y to pass on.
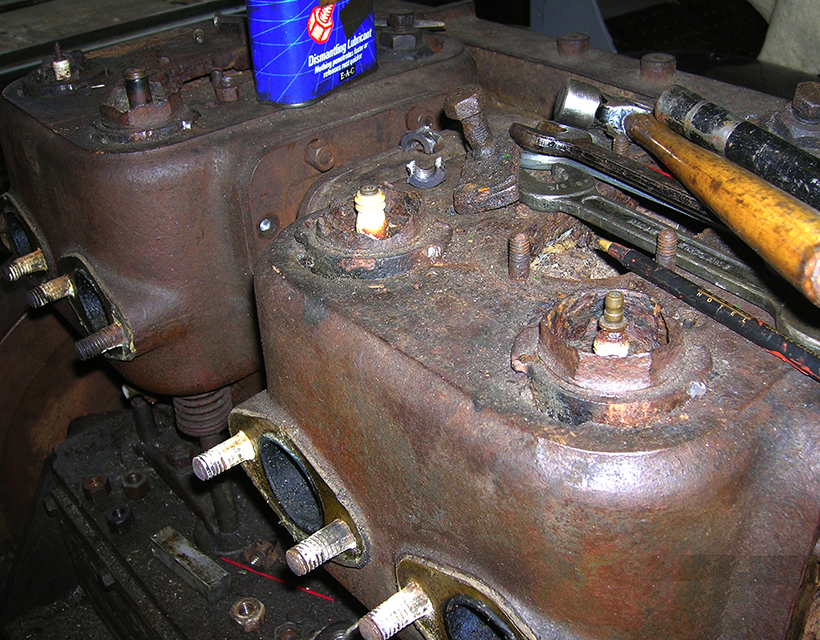
Dismantling the engine was particularly difficult. The locking sleeve arrangement which secures the valve caps had corroded away to virtually nothing.
Drilling out the locking sleeves was a particularly difficult exercise, as was making their replacements, which was undertaken by Tony.
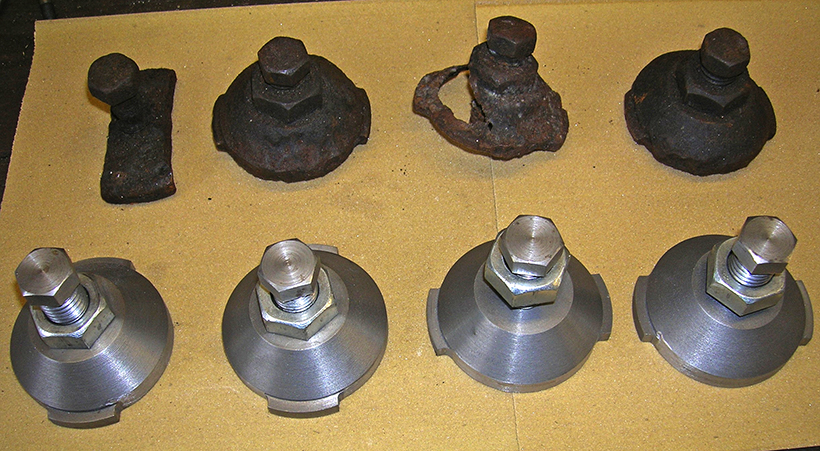
The locking covers for the inlet caps were also particularly rotten and difficult to remove. As no replacements were available Tony made the replacements.
The system adopted by Thornycroft of having a threaded section inside a locking dog to secure the valve caps was something Steve had never seen before and seemed unnecessarily complicated.
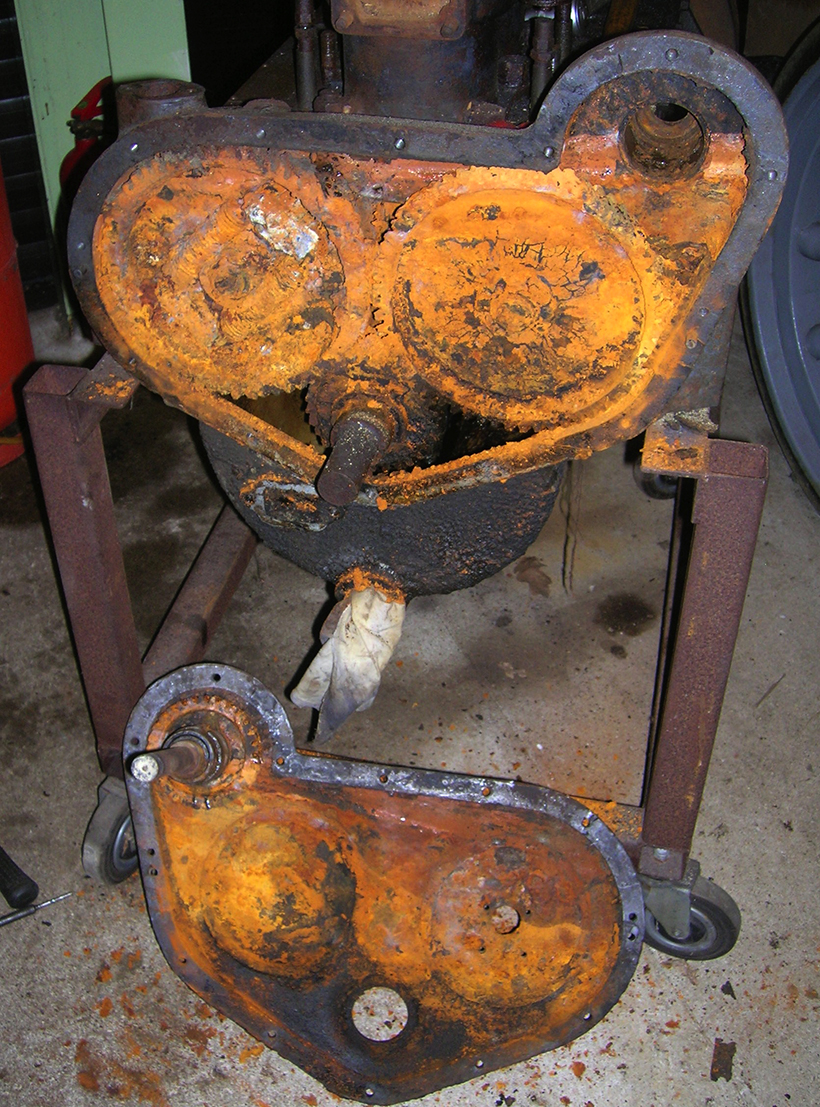
Removing the timing case cover revealed a great deal of corrosion. Thankfully, apart from the governor which was beyond salvation, this was just surface rust.
Choked waterways
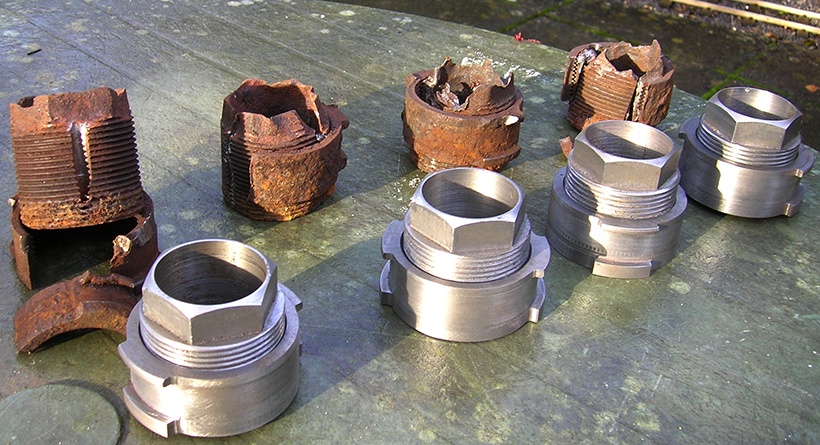
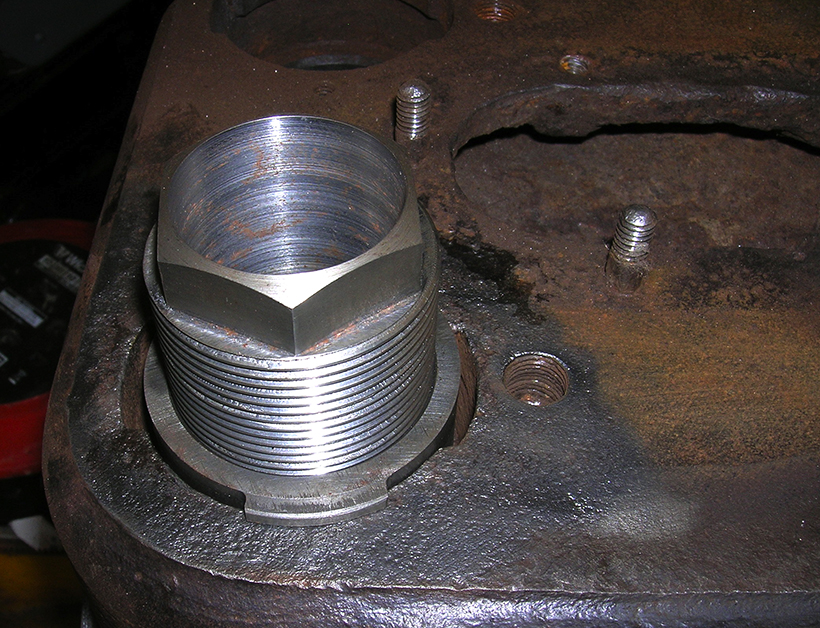
Taking the covers off the water jacket revealed the waterways to be packed full of rust and scale, which Tony laboriously dug out. With some effort, the manifolds were removed by splitting the nuts, but the hardest job was still to come. The spark plugs are screwed into a hex-threaded section which, in turn, is screwed into a locking sleeve with a bayonet cap-type fitting. The years and climate had taken a heavy toll, and these parts were so heavily corroded that there was virtually nothing left on which to grip. So, the long, laborious job of cutting them out was started, after which Tony set about making replacements.
It was at this stage Steve heard some wonderful news from good friend Mike Cameron, in New Zealand. He’d recently recovered a J Type back axle which, unusually, still had its differential, and he very kindly donated the complete assembly to Steve. It was packed into a shipping container to begin a long voyage that took it across the Pacific, through the Panama Canal, then across the Atlantic and into Tilbury Docks.
It arrived just before Christmas in 2011, and was opened on Boxing Day, so that the axle could be examined. Everything looked to be in excellent condition, and Steve was thrilled that this final, major component for the Thornycroft had, at last, been located. The half shafts and back wheels were removed, then everything was moved to the back of the shed until it would be needed. By this stage, it was 22 years since the Thornycroft had been purchased and, with just three years to go before the centenary of the start of the WW1, Steve had a great deal of work to do.
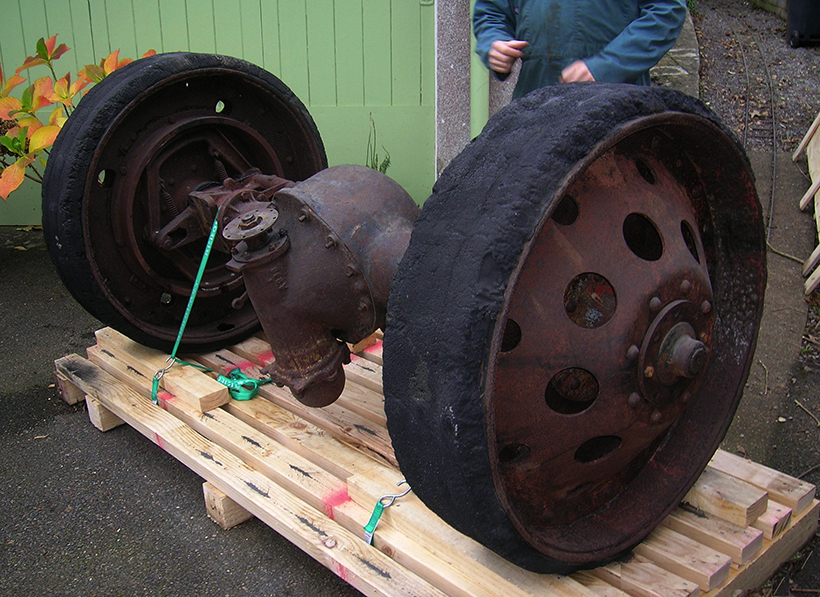
Many years after purchasing the Thornycroft, the desperately-needed back axle and differential turned up from New Zealand.
Slow strip-down
After examining the engine, it was clear that this would be the most challenging part of the restoration. Dismantling took several weeks of hard work, with the engine fighting back every step of the way. The pistons were solid and had to be jacked out by running a bar through each journal and winding down a bolt on each end until the piston let go. However, once out, they didn’t appear to be in bad condition, although one of the bores was really badly corroded.
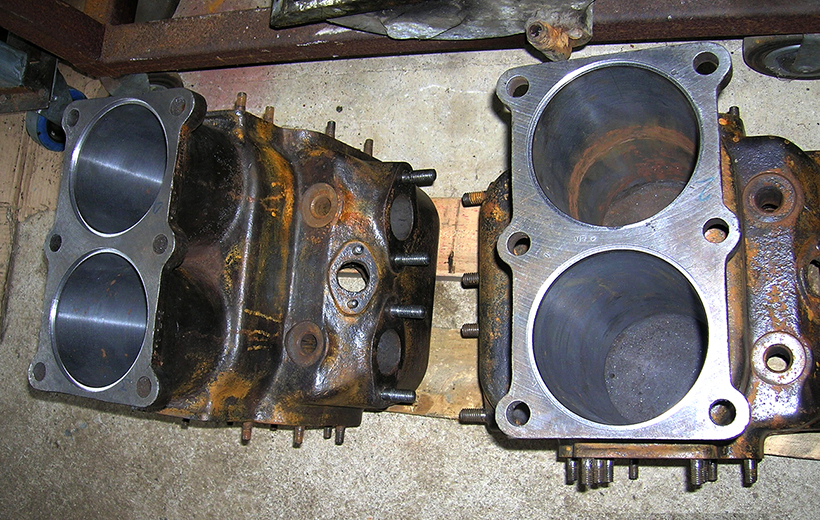
Even after having been bored-out, the cylinder bores still showed some evidence of corrosion.
Steve initially hoped that he could get away with just sleeving two cylinders, but a measurement of the other two cylinders revealed that, over the years, they’d ‘barrelled’ in shape, so it was decided to sleeve all four. To add to his woes, while cleaning up the blocks, cracks were found in both of them. The extent of these was verified by pressure-testing and, thankfully, they were only surface cracks, so not a concern.
The blocks were delivered to a local company who bored them out by 60 thousandths of an inch, and a good friend cut recesses into the foot of the blocks to take a flange on the liners to stop them moving. The liners were manufactured by Westwood Liners. After some discussion, it was decided to use Loctite to secure them in place as trying to press them in might have crushed the water jacket. Pushing the liners into place was a bit nerve-wracking but, fortunately, they all fitted perfectly, which was a great relief.
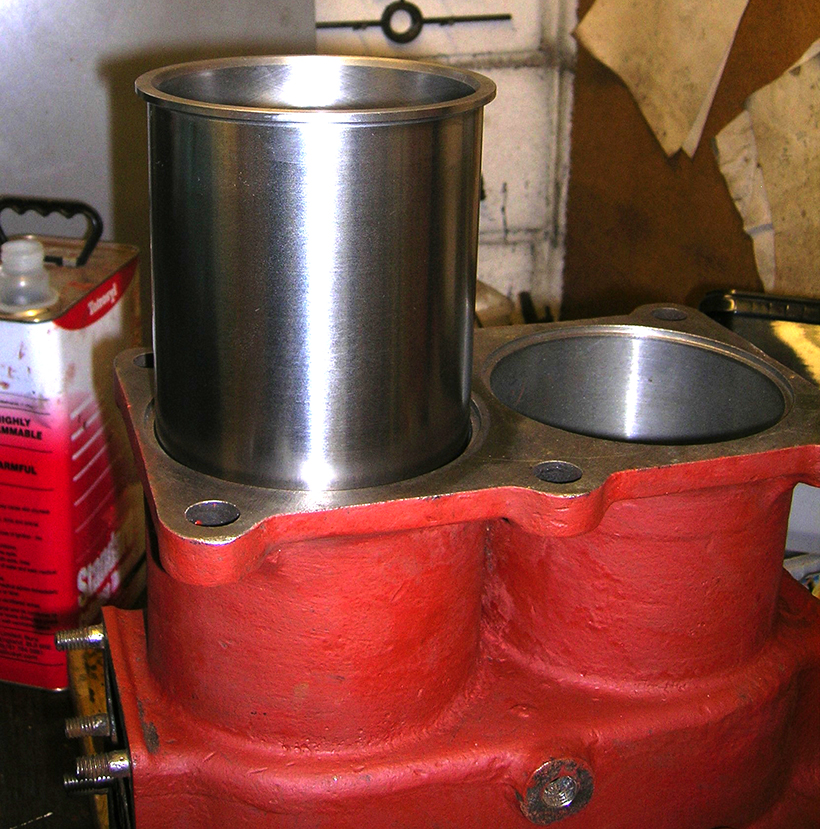
New liners were pressed into place. Steve’s measurements were spot-on; they were a perfect fit.
New pistons cast
The next problem was that the original pistons would no longer fit in the bores, so Steve set about making a pattern and had four new ones cast at a local foundry. Machining the gudgeon-pin holes was beyond the capabilities of Steve’s workshop, so he took them to a friend who had a large, vertical mill. With the pistons returned, Steve then turned them down and cut grooves for the rings.
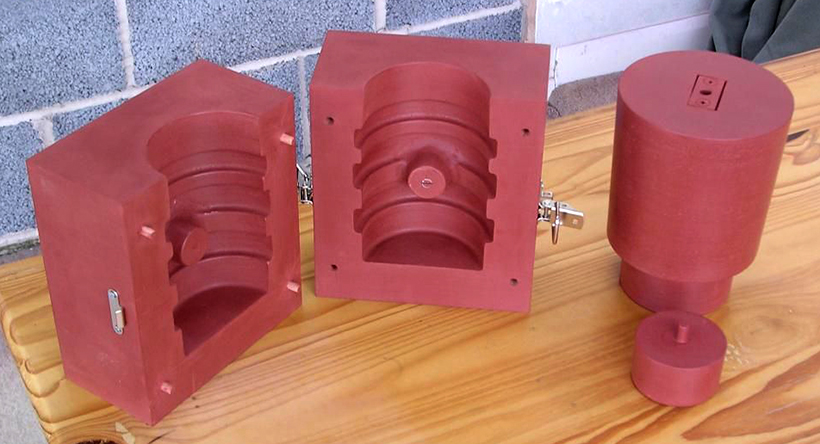
With liners now in the bores, the original pistons were no longer the right size, so Steve made a pattern and had four new ones cast.
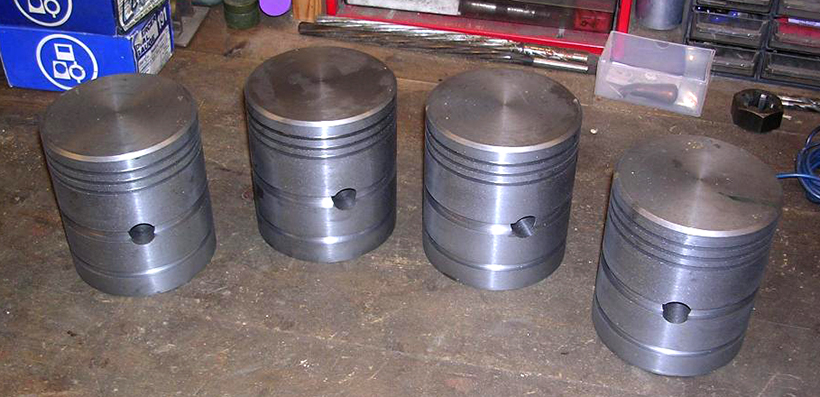
The completed pistons after they had been turned down, with slots cut for the rings and holes for the gudgeon pins.
The engine was coming back together and, thankfully, the spare engine provided some much needed replacement parts. The valves were found to be worn, so new ones were ordered from a specialist manufacturer, and some off-the-shelf valve springs were purchased. The valve seats were very heavily pitted, so good friend and motor mechanic, Dave Hayward, lent his time – and his valve seat cutters – to remedy this. The cam-followers cleaned up nicely, but the caps required attention, and all four exhaust valve guides were very heavily worn so replacements were machined from 500mm cast iron bar.
Partially reassembled, the engine is ready for the second block to be lowered into position.
The next challenge facing Steve was the water pump. An original came with the second engine, but the water inlet had been broken off. Rather than making a pattern for the whole casting, he did so for just the inlet and, after it had been cast, it was welded on by Steve’s friend, Adrian. The water pump was reassembled, but its aluminium shroud needed replacing, so Steve made a pattern for that. However, before it was cast, some Thornycroft parts came up for sale in an auction, and Steve came home with an original fan, an inlet manifold, a pair of headlamp brackets and a complete, original water pump. The shroud was removed from the latter, and used on the rebuilt pump.
Time was pressing
Steve’s intention was always to complete as many parts as possible before the restoration of the chassis commenced, which would free-up more room in the shed. It was now 2013 and, with the centenary of the outbreak of the war just one year away, it was clear that the target date of 2014 was unachievable. So, plans were revised for a finish in 2018, 100 years after the armistice.
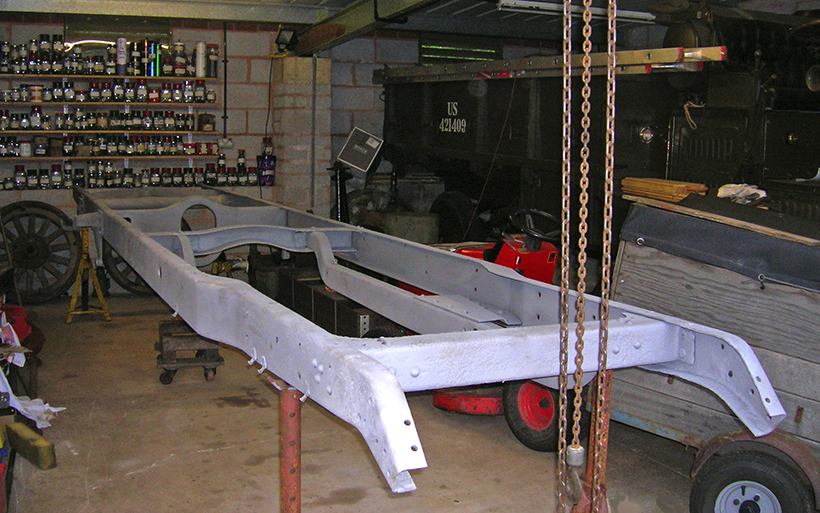
The chassis was sandblasted and made ready for painting. Soon the reassembly would begin.
The steering box from the Salisbury chassis was the only one that Steve had, and it was in poor condition, having been bent by an impact in the distant past. Gently, using his press, Steve straightened the worm, and refurbished the box. The original, four-spoke steering wheel was beyond salvation; they were made from steel tube surrounding a cast centre. It would be difficult to reproduce a one-off like this, so he adopted the approach of casting the whole wheel in aluminium.
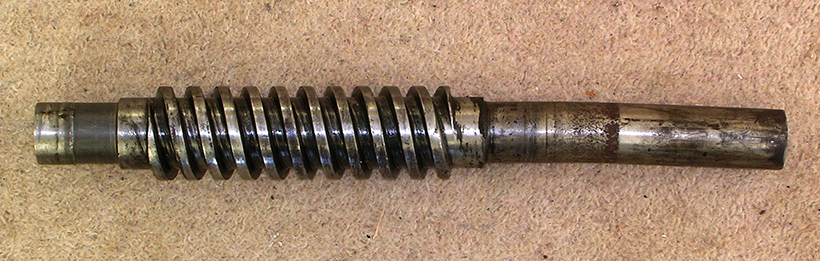
The steering box had taken a solid impact at some stage in its life, as can be seen by the pronounced bend in the worm. Steve carefully straightened this using his press.
Steve made a pattern from sections of MDF fixed to a metal frame, to which he attached 40, brass finger grips, each fashioned from a length of half-round brass, with the ends filed down by hand. A laborious job but, once the casting had been made and powder-coated, it was a perfect replica of an original Thornycroft steering wheel. Certainly, the foundry was very impressed with his pattern.
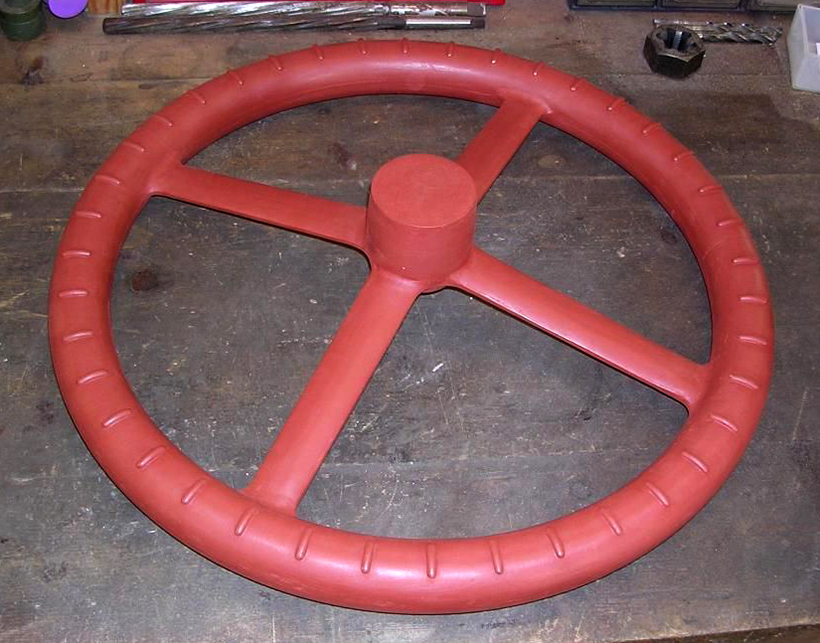
The pattern for the steering wheel was made from wood attached to a metal frame, with the finger grips cut from half-round brass.
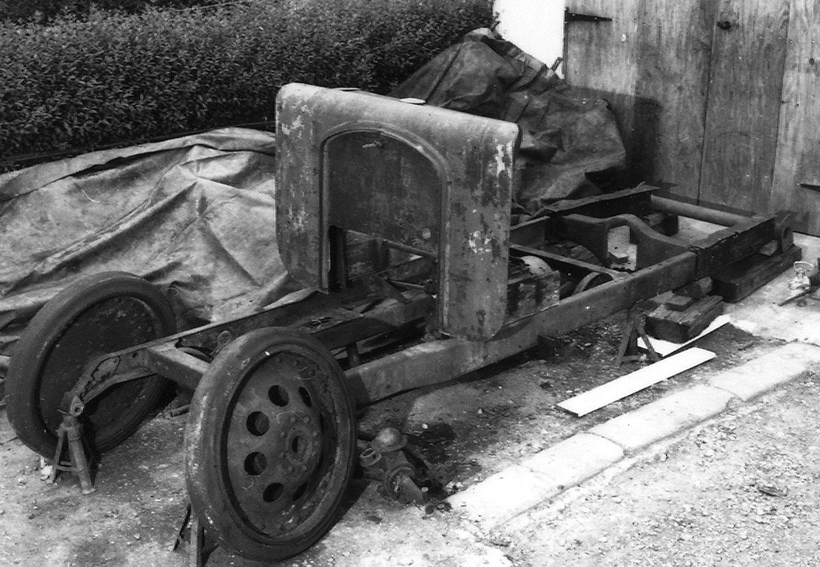
It was then time to start on the chassis, which had been sitting under a tarpaulin for well over 20 years. A close examination found it to be in good condition, apart from a crack above the front dumb iron, which would require welding. Also, a rotten, rear frame cross stretcher needed to be replaced. After the wheels, axles, brakes, steering and springs had been removed, the frame was taken away for sandblasting. It returned the next day when was then primered without delay.
Mobility, at last
The aim was to get it on all four wheels and mobile as quickly as possible. Tony made new shackle pins, and the springs (made some years earlier) were hung. The axles were cleaned, painted and refitted, but the front wheels – which had come with the chassis – were a poor condition. A conversation with Mike Jones (who got Steve started on this restoration) revealed that he remembered another pair which had been advertised for sale about 25 years earlier.
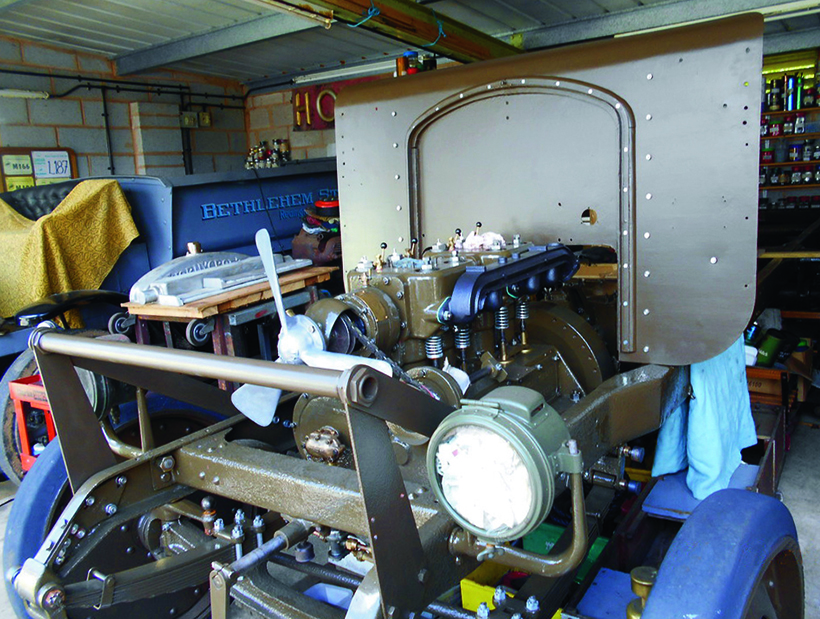
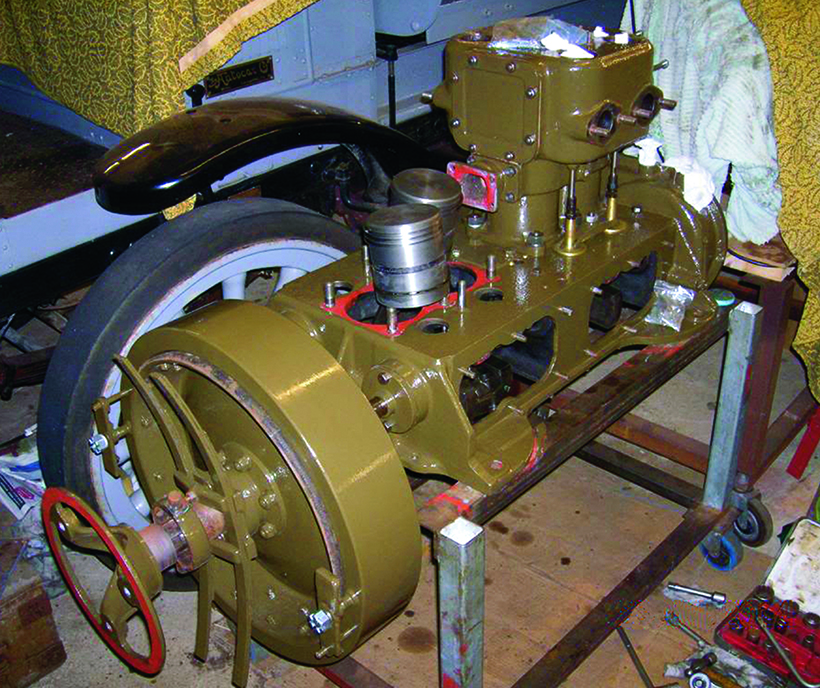
With the engine and scuttle now sitting on the chassis and the chassis on its wheels the Thornycroft is really beginning to come together. There was still a lot to do, though.
The advert was found and the owner contacted. He confirmed that he still had them and, as they were in much better condition than the ones that Steve already had, they were bought. Unfortunately, the bores were quite bell-mouthed, so Steve borrowed a friend’s lathe – large enough to take the whole wheel – and skimmed-out the bore and bushed them.
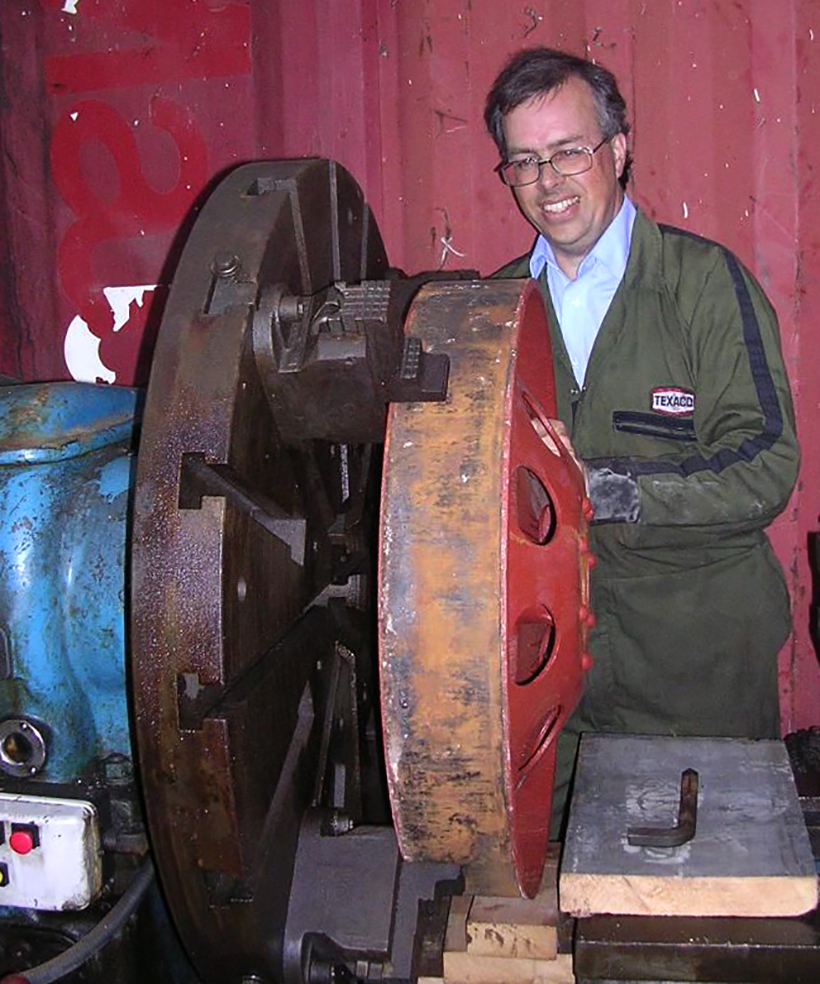
The bore of the front wheels had a pronounced ‘bell’ shape. To remove this, the wheels were placed in a lathe and the bore was turned down.
A pair of nearly-new, front, solid tyres were in stock, but nothing was available for the rear wheels, which had arrived from New Zealand with the back axle. Steve made contact with a company which made solid tyres out of polyurethane, and a set of four rear tyres were made to order. The wheels were sand-blasted, painted and then the tyres were pressed on using a friend’s 100-year-old tyre press.
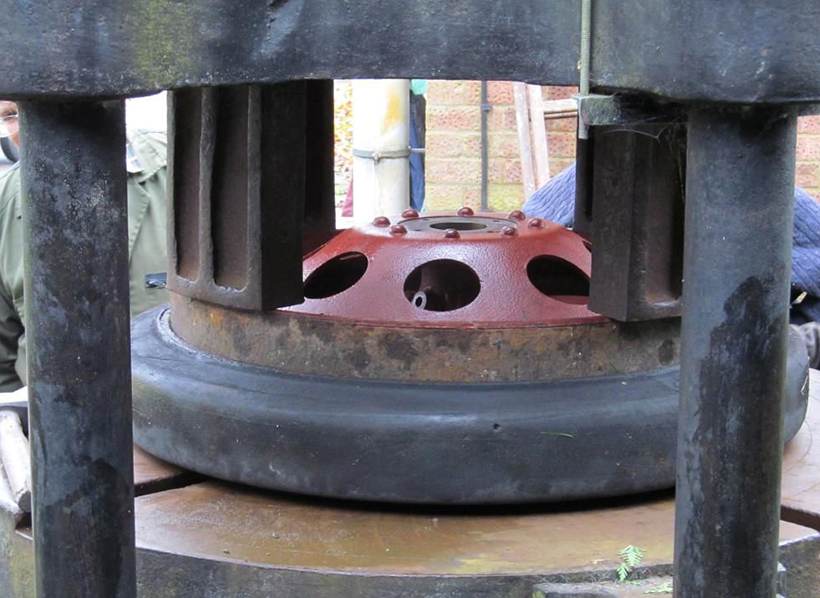
The tyres were pressed on to the wheels using a 100-year-old tyre press.
The reassembly of the engine was completed in December 2015. It had taken much longer than anticipated, but was now effectively a new engine. Now that the chassis could be moved on its own wheels, it was rolled under the chain block so that the engine and gearbox could be dropped in. This was a real milestone, but there was still a great deal to do.
More careful casting
Steve made a new starting handle, copying an original from photographs and measurements. Patterns were made for the casting of brake drums and shoes, which were then fitted. The clutch, controls and original scuttle from Wales were refurbished and fitted. The differential, which had arrived from New Zealand, was examined and found to be in excellent condition, so that was dropped in using an engine hoist. One job which Steve hadn’t been looking forward to was the assembly of the radiator core.
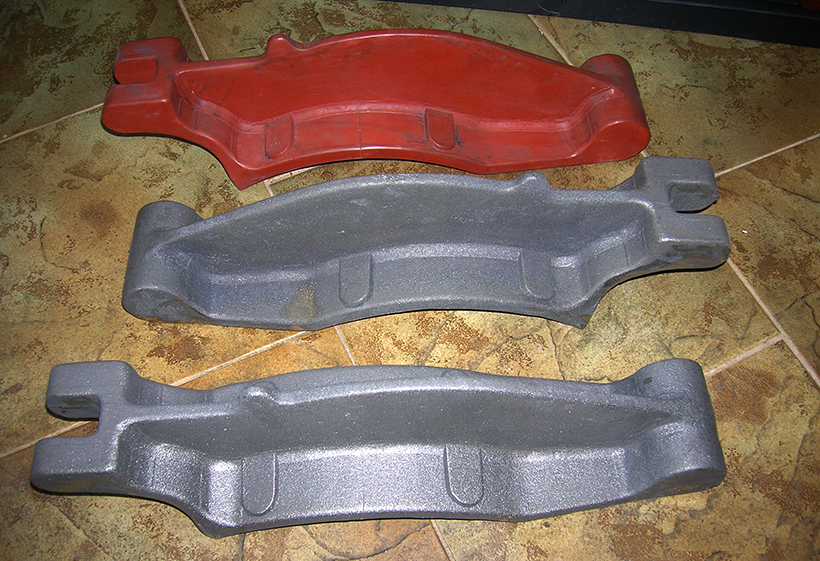
The transmission brake shoes were missing, so Steve made a pattern using measurements taken from a surviving example, and had the two shoes cast.
He took delivery of 120 copper tubes and 18,000 gills, which he threaded on to the tubes over the course of several evenings. With the top and bottom tank castings – which Steve had tucked away many years previously – the radiator was assembled, then mounted on the lorry. Steve had access to plans for the general service type body, and the timber for this and the seat were cut to Steve’s specifications by family friend, Mark Hartnell. Steve and Tony then assembled the body, which Tony brush-painted, and sign writer, John Corah, applied the War Department markings. The canvas and cab roof were superbly made to order, by Allied Forces of Berkeley.
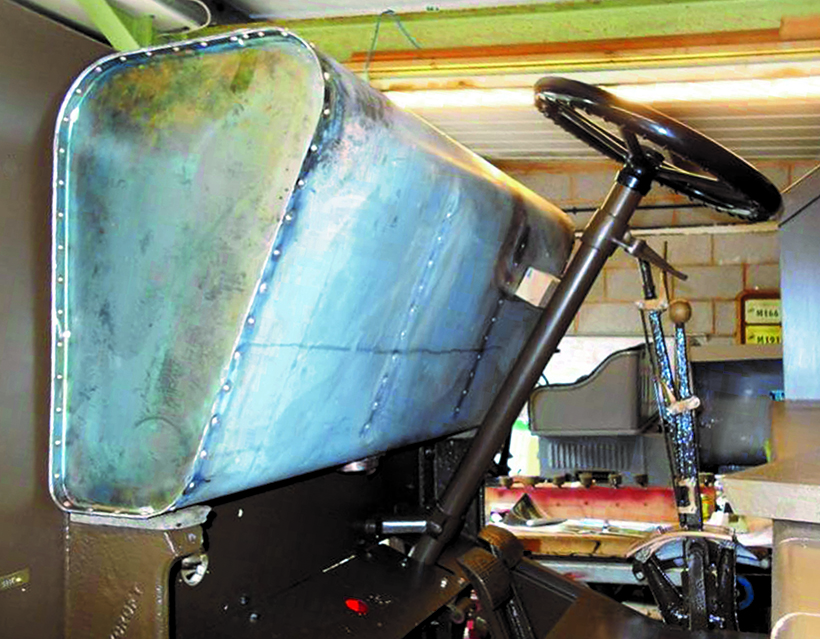
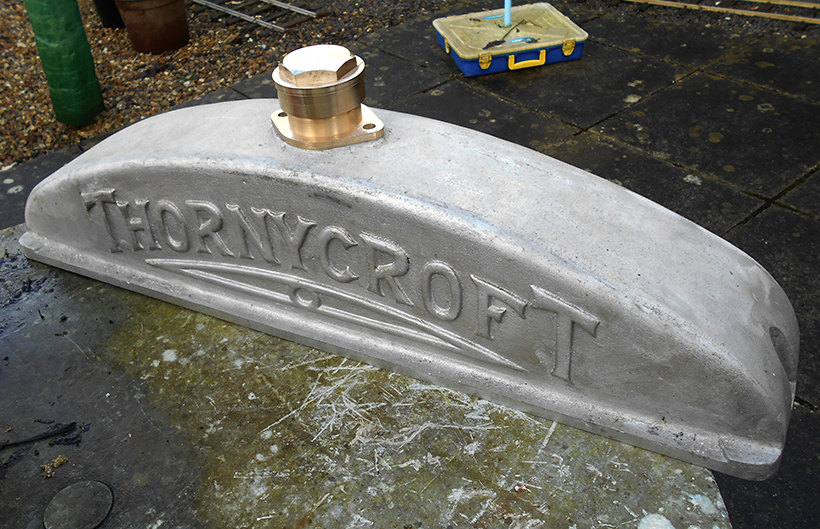
A trial fit of the fuel tank on the scuttle. The unusual shape is to allow room for the steering column and the driver’s legs.
The original fuel tank was beyond salvation, so Steve had to make a replacement. Sitting above the driver’s knees, it’s of an irregular shape, contains two baffles and is of riveted construction. Once assembled, the joints had to be soldered to prevent leaks. This took a couple of attempts to get right but, the finished structure is a faithful reproduction of the original.
Brighton-bound
With the centenary of the Armistice approaching, Steve had booked the Thornycroft in for the 2018 London to Brighton run, which was to include a large gathering of Great War vehicles. Time was getting very tight, and the engine was only started for the first time a week before the event. However, after a promising start and about 100 yards of travel, the engine came to an abrupt stop. After allowing it to cool, it was restarted so that the vehicle could return home for further investigation
The engine had become very tight to turn, so it was decided to strip it down, which meant that attending the Brighton run was impossible. As the blocks were removed, it became clear that, as the new pistons got hot, they’d expanded and become stuck inside the bores. Thankfully, no serious damage was done, but the pistons had to be skimmed, the bores honed-out and the damaged piston rings replaced. This took some time to complete so, regrettably, the 2018 season came and went.
With the engine rebuilt (for the second time), Steve took the Thornycroft for a quick road test and shake-down.
In fact, it wasn’t until June 2019 that the Thornycroft was ready for its next trip out. After a couple of short test runs, it was driven 20 miles to a vintage vehicle gathering at Haslebury Mill. It performed faultlessly there and back, and generated a great deal of interest at the event.
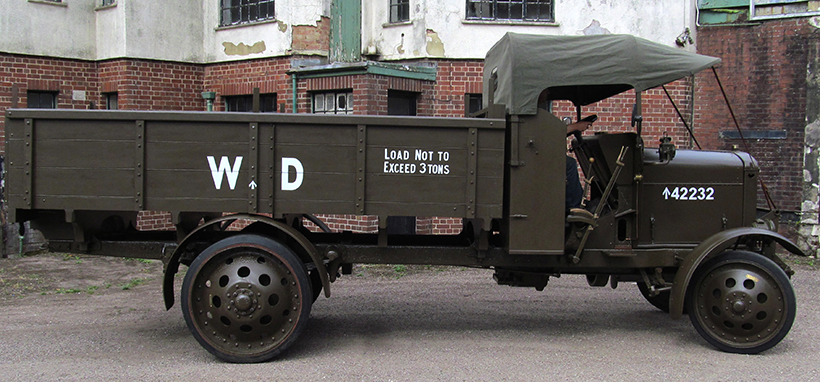
In 2019, this exceptionally long and complicated restoration was finally completed, but I think that you’ll agree the end result was worth all the effort.
The finished lorry is a remarkable restoration, especially when you consider the effort that went into locating and using so many original parts. Looking back on the day he purchased the Thornycroft, Steve often says that if he’d known then what he knows now, he’d never have bought it. I can certainly understand that view, but I’m also certain that when he looks at the finished vehicle, he doesn’t regret it one bit!
For a money-saving subscription to Old Glory magazine, simply click here