The decisive Battle of Midway explained
Posted by Chris Graham on 24th July 2022
Conrad Waters recounts the decisive Battle of Midway, which was a turning point in the Pacific theatre during World War II.
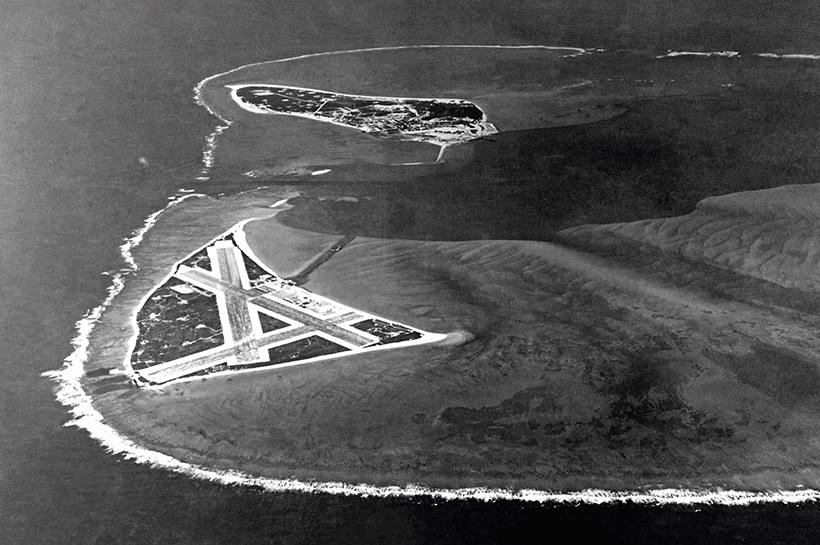
Battle of Midway: Midway Atoll, roughly equidistant between North America and Asia, occupied an important strategic location in 1942. (NHHC 80-G-451086)
June 2022 marks the 80th anniversary of the Battle of Midway, perhaps the most decisive naval battle of World War II. Fought largely between American and Japanese carrier-based aircraft, the engagement resulted in a crushing US Navy victory that put paid to Japan’s hopes of further Pacific expansion. Moreover, the destruction of the core of the Imperial Japanese Navy’s aircraft carrier force was a crippling blow from which it never fully recovered.
The Battle of Midway took place six months after Japan had entered World War II, when it had inflicted huge damage on the US Navy through the surprise attack on Pearl Harbor. The attack was followed by a succession of Japanese victories as territories across South East Asia and the Pacific were invaded and rapidly occupied. These swift successes gave Japan a feeling of invincibility, later termed ‘victory disease’, which was to play a part in the debacle that followed.
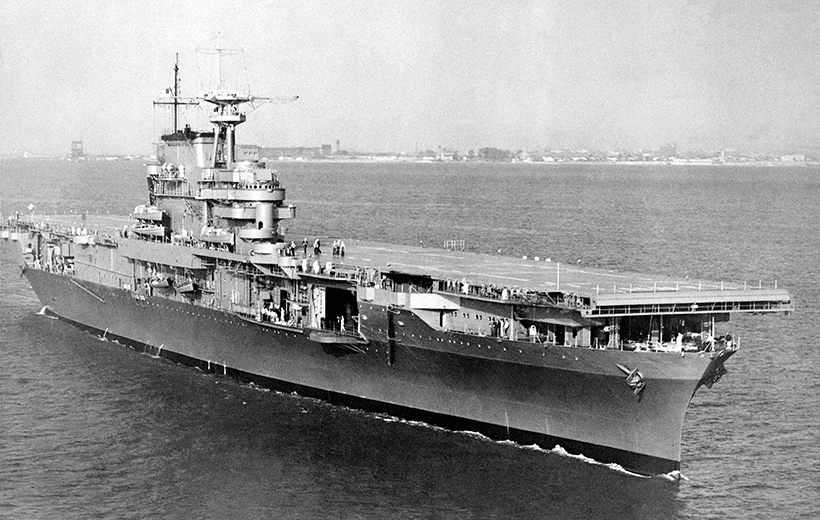
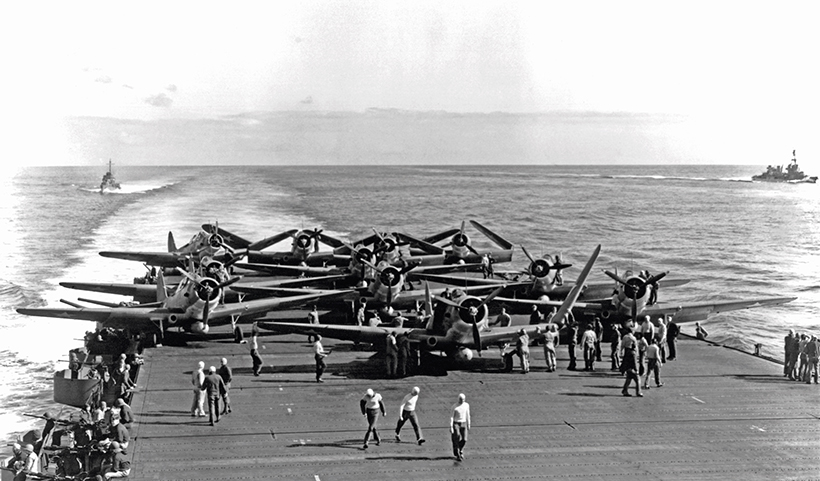
Only commissioned in October 1941, Hornet (CV‑8) was one of three aircraft carriers rushed to support the defence of Midway. (US National Archives 80-G-463613)
A key component of Japan’s early success was its large fleet of aircraft carriers. Focused on the strike force of the First Air Fleet, these ships made Japan the leading naval aviation power of the day. Six of these aircraft carriers had led the assault on Pearl Harbor. The carrier strike force played a key role in the advances that followed, devastating Darwin in Northern Australia in February 1942 and severely mauling the Royal Navy during the Indian Ocean raid some two months later.
By April 1942, Japan had achieved most of its initial objectives. However, the survival of the US Navy’s own carrier forces – which had escaped the destruction at Pearl Harbor – meant that these gains were not fully secure. This vulnerability was forcibly demonstrated by the carrier-based Doolittle air raid on Tokyo. The commander of Japan’s Combined Fleet, Admiral Isoroku Yamamoto, therefore gained support for a plan to destroy America’s naval aviation capacity.
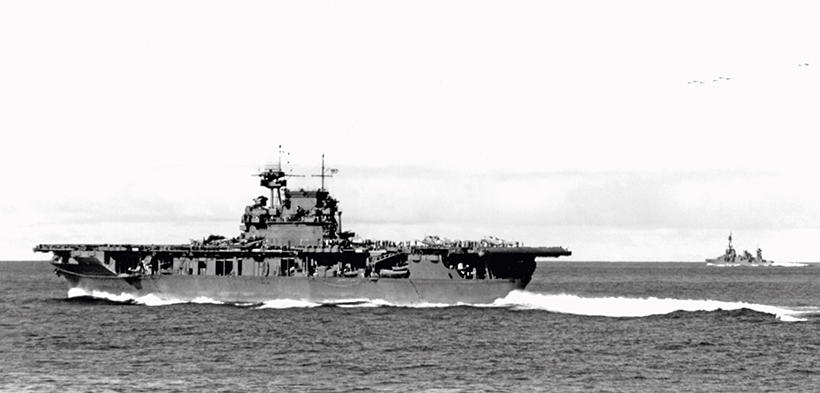
USS Enterprise (CV-6) pictured in the morning of 4th June, 1942. Before the end of the day, the US Navy would inflict a crippling defeat on Japan in the Battle of Midway. (US Naval History & Heritage Command (NHHC) 80-G-32225)
This plan was based on invading the American base on Midway, an atoll roughly equidistant between North America and Asia. Its occupation would extend Japan’s defensive perimeter, making the Japanese home islands more secure against US raids. Equally important, the invasion would likely result in a US Navy response, giving Japan the opportunity to destroy America’s all-important aircraft carriers.
Preparatory moves
Like many Japanese plans of the era, the Midway operation was complex. It involved secondary attacks on the Aleutian Islands and a complex dispersal of forces meant to hide the full extent of Japan’s strength from the supposedly inferior US Navy fleet. This left the brunt of the subsequent fighting to fall on a strike force commanded by Vice Admiral Chuichi Nagumo that was centred on the large ‘fleet’ carriers Akagi, Hiryu, Kaga and Soryu, supported by escorting warships. Two other Japanese fleet carriers, Shokaku and Zuikaku, had been involved in the Battle of the Coral Sea the previous month and were unavailable for the Midway invasion.
The Japanese aircraft carrier Soryu pictured taking avoiding action against a US Army Air Forces’ B-17 bomber attack. Initial land-based strikes against the Japanese force tasked with invading Midway were largely unsuccessful. (NHHC USAF_ID_4845)
Despite the lack of these two ships, the Japanese strike force that formed the mainstay of the Midway operation provided a formidable capability. It fielded nearly 250 carrier-based aircraft, manned by experienced and battle-tested aircrews. However, code-breaking and other intelligence activities meant that the US Navy knew both the location and time of Japan’s planned attack. This allowed Pacific Fleet commander Admiral Chester W. Nimitz to prepare a response.
The US Navy was able to deploy three aircraft carriers of its own for the forthcoming battle. These comprised the sisterships Enterprise (CV-6), Hornet (CV-8) and Yorktown (CV-5). The first two formed the heart of Task Force 16, commanded by Rear Admiral Raymond A. Spruance, while Yorktown was at the centre of Rear Admiral Frank Jack Fletcher’s Task Force 17. Fletcher was in overall operational command.
Aircraft from US Navy Torpedo Squadron Six (VT-6) being prepared for launch from USS Enterprise (CV-6) on 4th June, 1942. US Navy torpedo bombers suffered horrendous casualties at Midway. (NHHC 80-G-41686)
Yorktown had also just participated in the Battle of the Coral Sea, sustaining significant damage. However, temporary repairs hurriedly conducted at Pearl Harbor meant that – unlike Shokaku and Zuikaku – she was ready to participate in the Midway engagement. She was to make a significant difference.
Although the American carriers were outnumbered four to three, their larger aircraft-carrying capacity – around 230 aircraft – meant that their air groups closely matched the Japanese strength. In addition, there were nearly 130 additional planes based on Midway itself, providing the US forces with numerical superiority in the air. Although Japan had, perhaps, a qualitative advantage, the two sides were more closely matched than is often assumed.

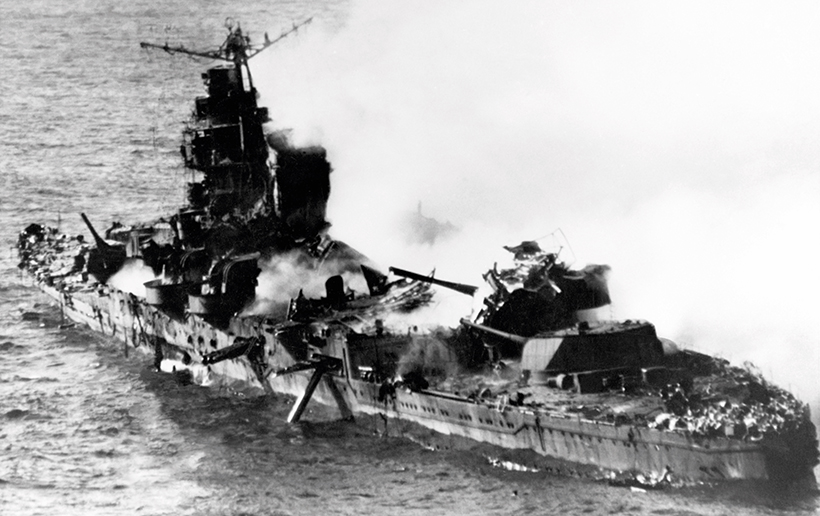
The wreck of the Japanese aircraft carrier Hiryu. She sank on the morning of 5th June, 1942. (NHHC NH 73065)
A devastating strike
The preliminaries to the Battle of Midway began on 3 June 1942 when US aircraft operating from Midway located and attacked some of the transports carrying the Japanese invasion force. Early the next morning, the main phase of the battle began with a Japanese carrier strike on Midway’s airfield and other installations. While the island’s fighter-based dedfences suffered grievous losses intercepting the raid, Midway’s runways remained operational. Meanwhile, Midway-based aircraft made determined but fruitless attacks on the main body of the enemy fleet.
Although unsuccessful, these attacks persuaded Nagumo that further efforts had to be made to neutralise Midway’s defences. Consequently, he ordered that his remaining planes should be armed with bombs suitable for destroying land-based targets in preparation for a second strike. While this process was taking place, the presence of US Navy aircraft carriers was reported. The Japanese plans were quickly changed as their aircraft were re-armed for a sortie against the American ships. It was to be too late. Rear Admiral Fletcher’s carriers were ideally positioned to ambush the Japanese force and he determined to conduct a strike as soon as was reasonably practical. Spruance’s Task Force 16 began launching its aircraft soon after 0700. Fletcher’s Yorktown followed over an hour later after completion of further reconnaissance. Arriving over the Japanese fleet from around 0920 onwards, these aircraft would determine the course of the battle in little over an hour.
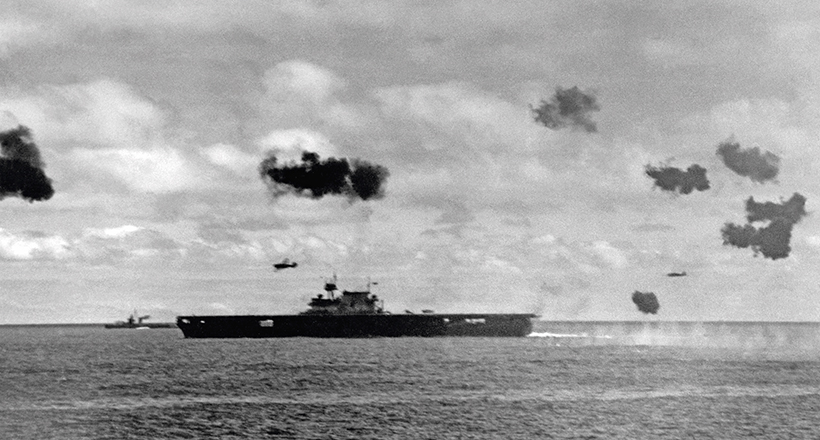
Japanese Nakajima B5N ‘Kate’ torpedo bombers strike back against the US Navy’s Yorktown (CV-5) in the afternoon of 4th June, 1942. (NHHC 80-G-32241)
Initially, the strikes did not go the Americans’ way. The US Navy was still in the learning phase of wartime carrier operations and there were difficulties in locating the Japanese fleet, as well as coordinating the resultant attacks. Douglas TBD Devastator torpedo bombers suffered horrendous casualties in the face of an onslaught from Mitsubishi AM6 Zero fighters and anti-aircraft defences, with only six out of 41 planes making it back to the US Navy carriers. Deficiencies in American torpedo design ensured that no hits were achieved.
The torpedo bombers’ sacrifice was, however, not to be totally in vain. While the Japanese fighter defences were drawn down to sea level, three squadrons of Douglas SBD Dauntless dive bombers from Enterprise and Yorktown fortuitously arrived on the scene. Finding themselves in almost the perfect position, they threw themselves into the attack. In the five minutes between 1020 and 1025, three carriers – Akagi, Kaga and Soryu – were transformed from the pride of the Japanese fleet into blazing wrecks.
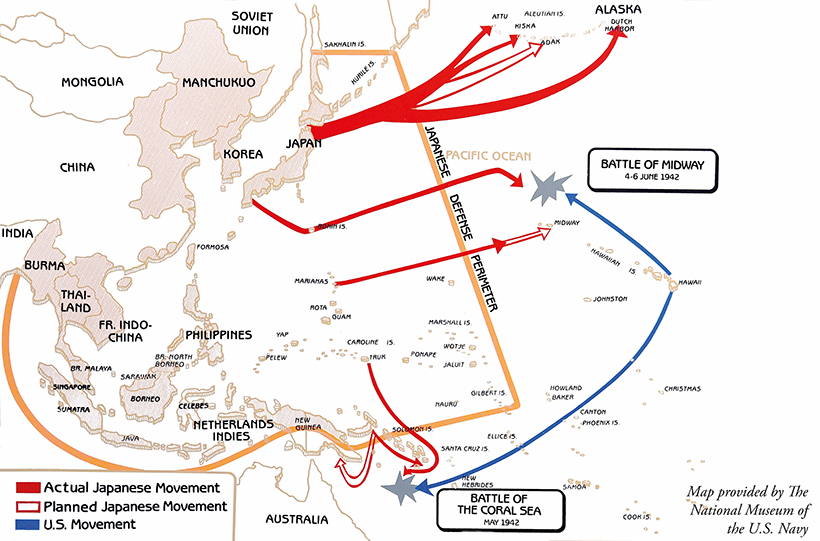
Intended to force the US Navy into a battle that would result in the destruction of its carrier fleet, the planned Japanese invasion of Midway formed one of a series of advances planned for May-June 1942.
Japan responds
Poor damage control, significantly exacerbated by secondary explosions among the armed and fuelled aircraft below decks, meant that none of the three ships would survive. Although initially remaining afloat, all were out of the fight and they would ultimately be scuttled by the early hours of 5 June as being beyond recovery. This still left one operational Japanese aircraft carrier. In spite of the devastation around her, Hiryu responded quickly, launching two successive attacks against the American Yorktown.
Hiryu’s initial sortie achieved three bomb hits, badly damaging Yorktown’s propulsion plant. Two torpedo hits in the subsequent attack completed the American carrier’s disablement, resulting in her abandonment with a severe list to port. However, Hiryu, in turn, had little chance to celebrate her success. A further sortie from Enterprise fatally damaged the ship later that afternoon, completing the destruction of the Japanese carrier force. She sank shortly after 0900 the next day.
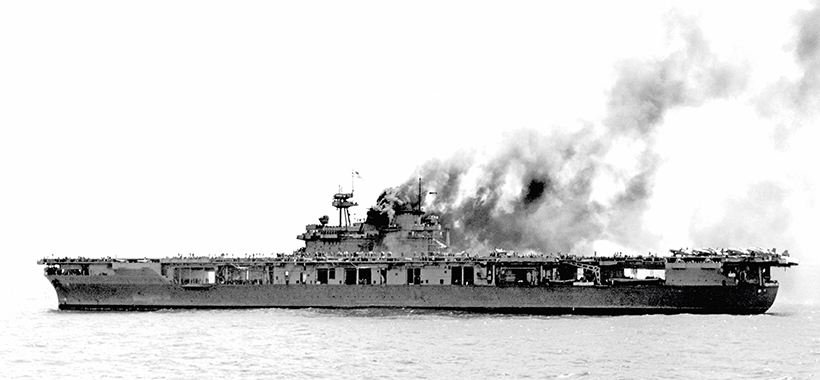
Yorktown (CV-5) ablaze after she had been hit by Japanese bombers operating from the carrier Hiryu. (NHHC 80-G-32301)
While the battle was to continue for a further two days, the Midway operation’s result was already determined. Admiral Yamamoto quickly decided to abandon the invasion after the loss of his carrier strike force and his fleet retired westwards. His retreat was harried by American aircraft, which scored a further success on 6 June. The heavy cruisers Mikuma and Mogami had collided while avoiding a US submarine attack, slowing their retreat. Dauntless bombers from Enterprise and Hornet savaged the ships, sinking Mikuma and leaving Mogami heavily damaged.
The final phase of the battle did not go all America’s way. Yorktown remained afloat after Hiryu’s attacks and she was later reboarded in the hope of salvage. However, she was torpedoed by the submarine I-168 on the afternoon of 6 June, finally succumbing to the cumulative damage of several attacks the next morning. The destroyer Hammann (DD-412) was also sunk by the same attack, giving Japan some measure of revenge for a crushing defeat.
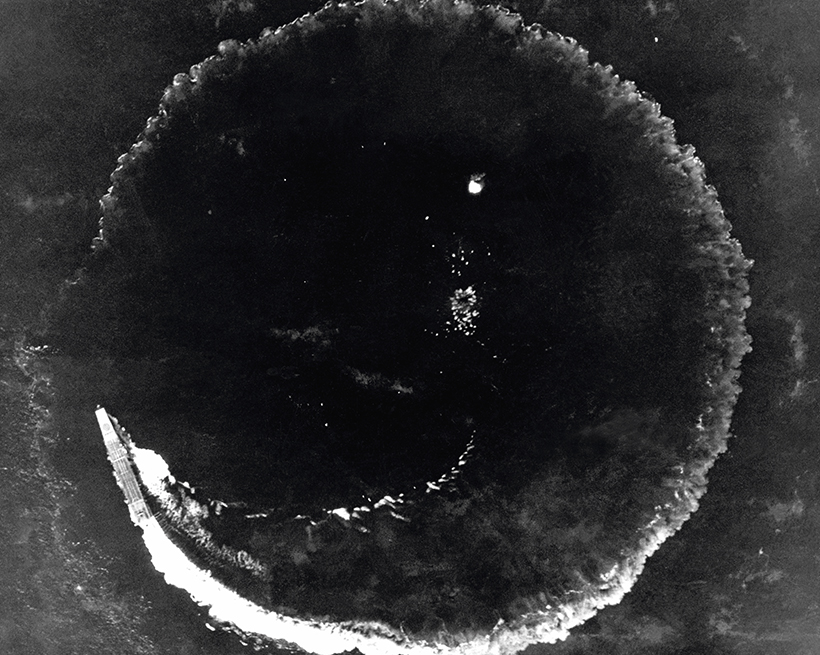
US Navy aircraft harried retreating Imperial Japanese Navy forces, and the Japanese heavy cruiser Mikuma was sunk during these attacks. (NHHC 80-G-414422)
The aftermath
Midway was a hard-fought but decisive victory for the US Navy. Although American casualties – notably in terms of valuable aircrew – were not insignificant, the heart of Japan’s carrier strike force had been destroyed and her plans for further advances halted. In addition to Japan’s heavy losses in materiel, many trained aircraft maintenance personnel had gone down with their ships, further hindering future operations.
In spite of the extent of the victory, it would be over three years before the Pacific War was won. The US Navy would receive setbacks of its own during this period, including the loss of Hornet at the Battle of the Santa Cruz Islands later that same year. Only Enterprise remained to represent the victors of Midway when the Navy Day Victory Review was held at New York in October 1945.
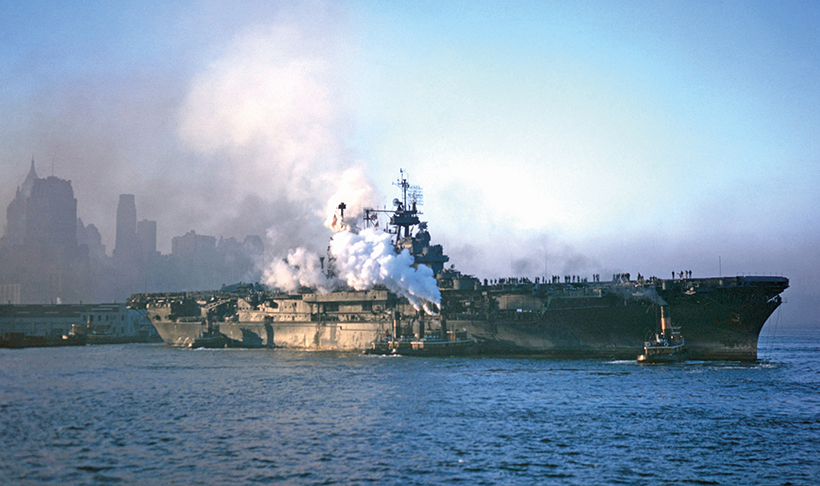
Enterprise (CV-6) arriving for the US Navy Day review in New York in October 1945. She was the only aircraft carrier that fought at Midway to survive the war. (US National Archives 80-GK-6557)
This feature comes from a recent issue of Ships Monthly, and you can get a money-saving subscription to this brilliant magazine simply by clicking HERE
Previous Post
1956 Bedford RL-based fire tender motorhome conversion
Next Post
New fire engines and brigade vehicles for collectors